Wednesday, November 16, 2011
Making Plein Air Panels
Fall is here! Hard to believe how quickly the year is going by. Fall is one of my favorite times of the year to get out and paint. The weather is perfect – not too hot and not too cold. The trees are dropping their foliage, which gives them a more interesting personality and the grasses are turning russet. The skies are free from smog, yet moody in character.
I recently gave a painting demonstration and had several of the artists interested in the panels I use as my supports for outdoor painting. Since this is such a great time of year to “get out there”, I thought I would share how I make my homemade panels.
These are the most affordable, lightweight panels of the highest quality I have found.
I hope you find this post informative and something you will want to explore.
MATERIALS:
I use a 3/8” gator board. You can find these at your art supply store in varying sizes. Find a size that fits your budget and size you can comfortably work with. For this demo, I am using a small size panel and Claussen #66 oil primed linen. You can use any linen or canvas for this technique I am about to explain.
You will also need a brayer, iron, newspaper (or something to protect your table/ floor from excess glue), mat knife.
First step is to cut your gator-board to a size you want to paint. I suggest trying a smaller panel to start out. Cut your linen or canvas to a size about ¾” to 1” larger than the gator board, so you have a ¼ to ½” overlay of canvas on all sides.
Use a foam roller to apply a thin layer of water based archival ph neutral glue -such as Elmer’s, Miracle Muck, lineco, to one side of the gator board and also a thin layer to the back-side (non gesso-ed side of the canvas or linen).
Next, carefully adhere the glue side of linen to the glue side of the gator board and using a brayer or rolling pin, roll from the center of the board out to the edges, pushing out any of the air gaps.
Now it’s time to iron… (Do not use the iron you use on your clothes, instead look for one at your local thrift store and keep it for craft use). Put the setting to low/ synthetic. It should be fairly warm but not hot as for cotton or linen (remember you are ironing over gesso).
Make a quick pass over all the fabric. The heat will suck the fabric to the board. Be sure to pay special attention to the ends and corners, to prevent puckering.
The next step is to weigh down your panel(s) and let it dry overnight. I make sure I wipe off the panels with a damp cloth to ensure there is no glue on the linen or backside of the panel. You can also put a sheet of wax paper under and between panels to protect all your surfaces. Here you can see I am weighing the panel down with some heavy art books… and yes, I have used wax paper to protect them. I will leave this overnight before trimming.
Trim the panel. In this view the gator-board is the correct size and all I need to do is simply trim off the excess canvas.
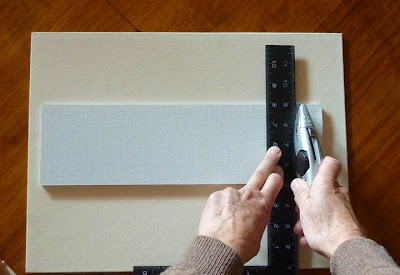
Once you get the hang of this, you can make larger panels and cut them to smaller size panels. If you are cutting multiple panels from one large board, you will need a sharp mat blade and a metal straight edge.
Here I am cutting through the gator board from the linen side to make a smaller panel or crop the panel to a smaller size. Note: This is also handy if you wish to crop a finished piece. Make sure you have cut through the fabric and at least half way through the gator board. Then you simply snap the board for a straight edge.
TA-DA! Finished smaller panel.
I find that figuring my sizes and cuts ahead of time, makes for very little waste.
Hope this has been a useful post and it makes for some great lightweight panels that you can transport out to the field and create gorgeous plein air studies of the fall landscape around you.
Subscribe to:
Post Comments (Atom)


1 comment:
OMG - THANK you! This is the most complete and easy to understand description I have ever seen. Thank you again for your generosity and time you took to do this!
Post a Comment