Wednesday, November 16, 2011

Making Plein Air Panels

Fall is here! Hard to believe how quickly the year is going by. Fall is one of my favorite times of the year to get out and paint. The weather is perfect – not too hot and not too cold. The trees are dropping their foliage, which gives them a more interesting personality and the grasses are turning russet. The skies are free from smog, yet moody in character. I recently gave a painting demonstration and had several of the artists interested in the panels I use as my supports for outdoor painting. Since this is such a great time of year to “get out there”, I thought I would share how I make my homemade panels. These are the most affordable, lightweight panels of the highest quality I have found. I hope you find this post informative and something you will want to explore. MATERIALS: I use a 3/8” gator board. You can find these at your art supply store in varying sizes. Find a size that fits your budget and size you can comfortably work with. For this demo, I am using a small size panel and Claussen #66 oil primed linen. You can use any linen or canvas for this technique I am about to explain. You will also need a brayer, iron, newspaper (or something to protect your table/ floor from excess glue), mat knife.
First step is to cut your gator-board to a size you want to paint. I suggest trying a smaller panel to start out. Cut your linen or canvas to a size about ¾” to 1” larger than the gator board, so you have a ¼ to ½” overlay of canvas on all sides.
Use a foam roller to apply a thin layer of water based archival ph neutral glue -such as Elmer’s, Miracle Muck, lineco, to one side of the gator board and also a thin layer to the back-side (non gesso-ed side of the canvas or linen).
Next, carefully adhere the glue side of linen to the glue side of the gator board and using a brayer or rolling pin, roll from the center of the board out to the edges, pushing out any of the air gaps.
Now it’s time to iron… (Do not use the iron you use on your clothes, instead look for one at your local thrift store and keep it for craft use). Put the setting to low/ synthetic. It should be fairly warm but not hot as for cotton or linen (remember you are ironing over gesso). Make a quick pass over all the fabric. The heat will suck the fabric to the board. Be sure to pay special attention to the ends and corners, to prevent puckering.
The next step is to weigh down your panel(s) and let it dry overnight. I make sure I wipe off the panels with a damp cloth to ensure there is no glue on the linen or backside of the panel. You can also put a sheet of wax paper under and between panels to protect all your surfaces. Here you can see I am weighing the panel down with some heavy art books… and yes, I have used wax paper to protect them. I will leave this overnight before trimming.
Trim the panel. In this view the gator-board is the correct size and all I need to do is simply trim off the excess canvas.
Once you get the hang of this, you can make larger panels and cut them to smaller size panels. If you are cutting multiple panels from one large board, you will need a sharp mat blade and a metal straight edge. Here I am cutting through the gator board from the linen side to make a smaller panel or crop the panel to a smaller size. Note: This is also handy if you wish to crop a finished piece. Make sure you have cut through the fabric and at least half way through the gator board. Then you simply snap the board for a straight edge.
TA-DA! Finished smaller panel.
I find that figuring my sizes and cuts ahead of time, makes for very little waste. Hope this has been a useful post and it makes for some great lightweight panels that you can transport out to the field and create gorgeous plein air studies of the fall landscape around you.

Tuesday, October 11, 2011

A new challenge


Creating in another medium.

I have been distracted for the last 3 months with a project that utilized some creativity along with endurance and muscle. It was spent remodeling a rental property that my husband and I own, which had been neglected for the past 12+years. Luckily our last tenant stayed for that duration, but on the other hand the deferred maintenance took a huge toll on the poor dwelling. It required a total gut job from the floor up.

Since this is “income property”, there was no time to dally around and put it off… like we have done with so many other things in our life (tenting for termites, constructing a trust… and deferred upgrades in our own home). It put me on a timeline to go from start to finish. Something we can’t always do with painting.

So… this quick little post is to let you know, I’ll be back into posting again… but more importantly to say that sometimes there are situations out of our control that keep us from getting to the finish line when we expect to. I know for me, this can happen with painting.

Don’t let the pressure of deadlines dictate a finished painting. Be your best judge to let things go out when you “know” they are ready.
Let the canvas sit in the studio longer, look at it in different rooms, under different light. Then set it into the frame and look at it more. The time you spend “vetting” your work, will ensure that you have given it the time needed to bring it to the finish line.

In closing… remember to make time to take care of yourself and the things in your life that matter.

With much gratitude,

Robin

Monday, April 11, 2011

Your Palette to Success

Palette organization can help keep your colors fresh and radiant, which is just one way to keep your paintings “winning”.

Here are some tips to keep your palette working for you and not against you.

Step one: Lay out your colors the same every time. Every time. Every time. They say if you read or hear something 3 times it will sink in. So here is one extra mention to make sure it sticks… Every-time.
If you are painting outdoors, you may be working with fewer colors, as opposed to when working in the studio. When using fewer tubes, still lay the colors on hand out in the same pattern. Here is the reason: so you never need to look or think about the color you are dipping into. You should be able to paint in total darkness, because you know where every color is.

Think of your palette as your keyboard. You are going to write a novel, and the letters on the keypad change every time you sit down to type, consider the time and energy it will take you to find each letter to form a word, to structure a sentence and ultimately write the book. The same is true when painting. If you have a color in your mind you want to mix and find yourself looking around your palette for where you put the blue, your concentration has now shifted from that color you wish to mix to searching for and locating the blue. Now you have broken the flow of creation.

Painting is difficult but we can lessen our struggles with an organized palette.

Lets make a note here also about squeezing out enough paint. Paintings can appear dull and drab if you are miserly with your paint. Make sure you put enough down. That way you won’t need to continually stop to add more. Also, squeeze out all your stable of colors. Just because you think you will not need “red” – still put a little on your palette. You will need it! Why sacrifice the quality of your art, by pre thinking what you might or might not need. Give yourself every opportunity for success.

Below is a palette that has colors laid out in an organized manner. This palette has had years of use. You can see that the colors have always been put out in the same place every time. How you decide to arrange your colors is entirely up to you. This example is a prismatic layout (rainbow order).


Palette laid out…Now for Puddle Jumping.

Mix your colors in puddles.

Example:


The reason for puddles is that when you make a color mixture, that new color will be unique with it’s own hue and value. This puddle holds valuable information. When mixing another color of the same value… the reference is right there to compare, side by side. Or possibly you need the same color with a darker value. Again you can reference from the original puddle.

The other great advantage to keeping paint puddles, is that these puddles can be treated as additional colors on your palette. Different from your tube paints, these are colored mixtures are available to use in new mixtures. Using puddle mixes can also help paintings keep a cohesive finish.

Eventually the puddles will take over the palette. Don’t be lazy. Wipe the mixing area off, so you have a clean area to work in. Color gets dull and muddy from working on a disorderly and chaotic palette.


Check your palette score.

Organized Layout.

Enough Paint squeezed out

All your colors on the palette

Clean mixing area

WINNING!!!!!!

Sunday, January 30, 2011

How To Stretch a Canvas

“How To Stretch a Canvas for Painting”. Stretch your dollars, define your dimensions….and then canvas your world.

TOOLS NEEDED:
canvas pliers (I recommend the ones that have a rubber grip)
Heavy-duty staple gun. “Powershot” is my favorite.
Wood Stretcher Bars: 4 total, (2 pair- each of duplicate length).
Canvas or linen.
square
tape measure


All stretcher bars come with at least one side that has a raised ridge along the edge (some bars are raised on both sides). If your bars have only one side with the ridge, make sure they are fastened together so the ridges are all on the same side. This matters.


Step 1:
Your support (stretcher bars) for the canvas must first be put together ;each length has a 45˚ angle on each end. Once they are joined you will have a frame (support) square or rectangular with 90˚corners.
Measure to insure you have a perfect right angle (90˚) on each corner. To check this -measure each diagonal with a tape measure and confirm the diagonal lengths are the same . The example below shows each diagonal to be 17.5 inches.


Once you are confident the bars all have a 90˚ angle, staple each corner of the wood bars to secure them. If you wish to use canvas keys later (small wooden wedges), you can remove these staples once the canvas is attached.

Step 2:
Linen and/or canvas can be purchased either in a roll or by the yard. I think the roll is a better value, but if you are trying this for the first time, you might want to buy your canvas by the yard for your test trial. I will use the word “canvas”to represent both canvas and linen. Notice there is a gesso side and a raw side to your canvas. You will want to do your painting on the gesso side.

Amount: You will need your fabric to be a minimum of 4” larger than the dimensions of each length of your desired canvas size. As an example – a canvas size of 16”x20”, would require a swatch of canvas to be no smaller than 20”x24”, or as another example an 8”x10” would require a sample of 12” x 14”.

Step 3:
Layout: Important- do not fail to pay attention to this step. Make sure that when you measure and lay out the fabric, the woof (weft) and warp is perpendicular and parallel to the stretcher bars. (http://en.wikipedia.org/wiki/Weaving) Basically the threads that run horizontal must line up with the horizontal bars. The vertical threads must be parallel to the vertical bars. If the threads do not line up with your bars, your finished canvas will have puckers or ripples.


Step 4:
Cut the fabric so you have 1.5” or 2” beyond each stretcher support. This will allow you to have enough fabric to grab the canvas over the wood bars with your pliers. Example:


Step 5: Lay canvas -Gesso side down. Place your stretcher bar support on the raw unprimed side of the canvas. The raw fabric side should be facing up toward you. Make sure the wood support frame has the raised lip facing down against the raw canvas.


Once your support and canvas are properly aligned, lift one edge of the canvas and staple it to the support. Do this with care, so you don’t disturb the layout position of the canvas and support.


Step 6: On the opposite end, use your pliers to stretch the canvas over the support, so now you will have 2 opposite ends stapled.


Step 7: Now rotate your support (wood frame) and canvas and stretch a 3rd side and staple along end.


Step 8: Repeat on the 4th unattached length. You should now have 4 sides stapled. It will have a diamond shaped pucker on the gesso side of the canvas. example:


Step 9: Now you will pull and staple the canvas on the left side of the existing staple- and then the right side of the first staple. Keep your staples evenly spaced, approx. 1” apart. Rotate and repeat this process until you have staples all 4 sides. The diamond shape pucker on the front of your canvas will get larger and less pronounced as you work toward the edge of your support. NOTE: you are only putting 2 staples in at a time and then rotating. Do not attempt to staple an entire length or side all at once. You must keep rotating after you have added 2 staples.


Step 10: Repeat step 9: 2 staples 1” away from each existing staple -and rotate. 2 staples and rotate, 2 staples and rotate, until you have completely fastened the canvas across the entire edge of each length. The diamond pucker on the front should be completely gone now. Your canvas should look like the example and have no puckers. (If you have puckers, go back and check what is off. Either the canvas was not true to woof & warp, or your stretcher bars were not at true 90˚ angles. You will need to remove all your staples and try again).


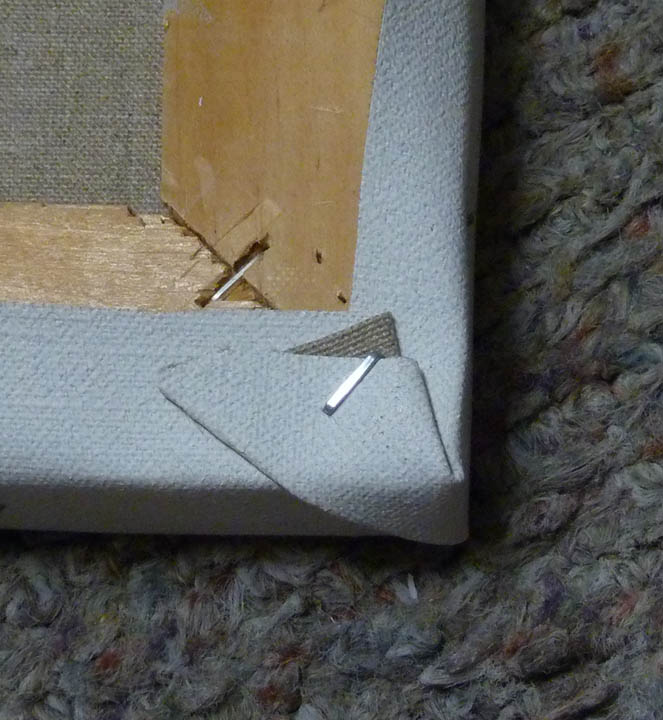
Step 11: Securing the corners and finish: fold one corner over, make a pleat and fold over again as shown. Then staple the corner down.


You’re done! Bravo.